What you will need:
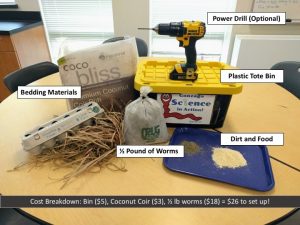
Plastic Tote Bin
Any non-see through plastic tote bin that is between 5-20 gallons in size. Pictured here is a 5 gallon plastic tote that was purchased for $5 at Lowes. This is a good size for a classroom bin or traveling worm bin. *Note: You can also use a plastic bucket, like an orange all purpose bucket from Home Depot! Clear bins can work too, but worms like it dark so that is best.1/4 or 1/2 pound of Red Wiggler Worms
A quarter or half pound of red wiggler worms is about 200-500 worms. You can purchase this specific type of worm at local seed & feed type stores, at fishing bate shops, or on the internet. You want the Eisenia fetida species (not European Night Crawlers). There are a few worms that can be called “Red Wigglers,” especially if you go to a fishing bate store. The kind you want are very tiny and delicate looking (photo below). I got my worms here in Spokane, WA at Marle Worm Growers (can be purchased online ands shipped!) and also at Northwest Seed & Feed. You can also check with local or county composting offices for free worms. You don’t need a huge amount of worms to start because they will reproduce quickly. This is just an amount to get your bin started!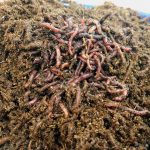
Bedding Material
Bedding material can be one or a combination of any of these items: 1) shredded newspaper (no glossy ads) 2) Shredded/torn paper grocery bags 3)cardboard egg cartons 4)Coconut coir You can just use coconut coir alone or any combination of these items! (No white printer paper!). You can get coco-coir at local seed & feed stores or garden supply centers but you can also find it as reptile bedding too (just make sure to check there’s no other additives if you do that). I do a combo of shredded newspaper or paper grocery bags and coco coir, which is my favorite way to go. The coco coir really helps to keep moisture levels in control plus it’s nice and fluffy for the worms and gives good air pockets.Electric Drill -Optional
Your worms need airflow and you have the option of simply taking the lid off or keeping the lid only partially closed, or drilling some holes in the top of the lid and around the sides. The worms will not crawl out the holes. I used the 5/8 size drill bit for mine. If you don’t have a drill, don’t fret…just leave the lid slightly open!Food Scraps or DIY Worm Chow & Some dirt
Fruit and vegetable trimmings or scraps are primo word food. Some people make worm chow’s with ground up oats and flour. I will go into detail below about types of food. Add some fine (i.e. small size dirt, not sand, think dust size) from your yard to the bin to supply some grit for the worms. This is optional as well.How to Put Your Bin Together
- Drill Air holes
- If drilling holes on lid and around the sides towards the top of the bin, do that first!
- Prepare plastic tote by rinsing it out with water
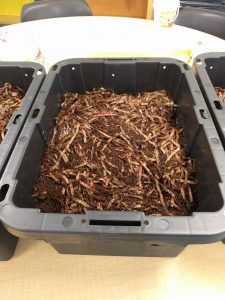
- Moisten the bedding and add to the bin.
- You want the bedding to be damp, but not dripping with water -think like a sponge that you have wrung out! It’s still wet to the touch, but if you squeeze it no water drips out. If using the coconut coir, start by re-hydrating it first by adding water and breaking it up. Continue to add water and fluff it. Then add paper shreds and mix and moisten further as necessary.
- Add worms to the bin.
- Simply place the worms on top of the moist bedding, they will squirm down into the bedding and away from the light on their own.
- Add a little food.
- It’s nice to add a small amount of food to start, about a handful or so. It will take the worms a few days to really adjust to their new space and start eating voraciously. So just start with a small amount at first and check on it. (More details about adding food below).
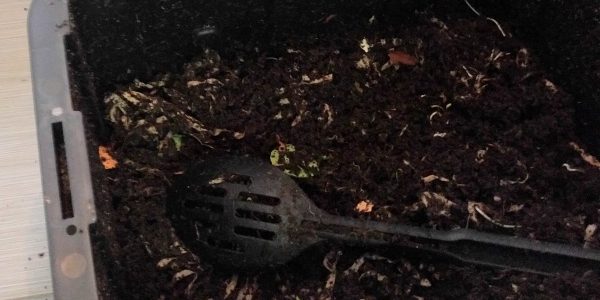
 And below is what your bin will look like after two or three months, almost ready to harvest! You will see that most of the light brown coco coir and shreds of newspaper are now dark, rich earth like material and you can’t see as many newspaper shreds. Also, the volume will be reduced by half as it really gets compact in there as the worms process it!

How & What foods to put in the bin
We’re here because want to turn our food scraps into use compost instead of throwing them away, right? Here’s the deal, folks: technically, worms can eat anything (even meat!), but you don’t want to put fats, sugary foods, or meat in your bin. Here’s why: because fatty foods, meat, and sugary foods can get FUNKY and smelly and, if your bin was outdoors, could attract unwanted animal visitors. I mention this because many people incorrectly teach children that worms CAN’T eat meat or fatty foods simply because we don’t want to put those in the bin at home. But that is incorrect science. We want to teach children about decomposers and what they are capable of, just explain to them the reason why we don’t put meat, sugary things, or fatty things like dairy into our bin (see above). What foods CAN you put in a worm bin? (See “How to Add Food,” below, as well) -Vegetables and fruits (carrot peels, carrot tops, lettuce mix that has gone bad, zucchini ends, strawberry tops, apple cores, chopped up banana peels, etc.) -Tea Bags and Coffee grounds (don’t add too many coffee grounds as it can become acidic but a 2-3 tablespoons per week is okay) -Crushed up egg shells -Plain cooked pasta or grains with no sauces or leftover oatmeal -Non-sugary cereal, like cheerios -Moldy or stale bread -Soaked oats or flours like wheat flour -NO CITRUS PEELS!!! TIPS:- The smaller the pieces put in, the faster they compost! Chop or break things up when you can.
- When in doubt about a food, do a quick google search to confirm! Also, chop or break food up as much as possible to help the worms eat it more quickly. Can you put moldy food in the bin? If it is slightly moldy, yes! Molds are a natural part of the decomposition process.

A great “worm breakfast” of chopped up apple, leftover lettuce, moldy blueberries, old oatmeal, and some dirt from the garden.
How to harvest the compost
Ah, the beautiful, dark, earthy end product…the compost! Once you notice that your bedding has mostly been turned into compost (or really worm castings…the nice word meaning worm poop, hah!), you should stop adding food and let the worms finish breaking down any last clumps of shredded paper and food scraps for a week or so. Once all the food has been decomposed, it’s time to harvest your compost! Here’s how you do it:What you need:
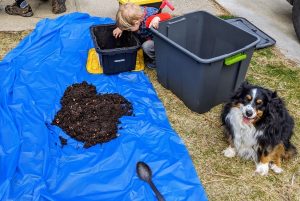
-Plastic tarp or tray to put the compost on and keep your area clean -Place to store finished compost, such as a separate plastic bucket. Instructions:- Dump out the contents of your worm bin onto a plastic tarp on a table or in your yard.
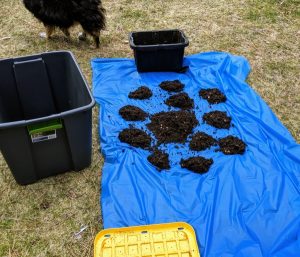
- Separate into small piles.
- Wait 10-15 minutes for the worms to dig to the bottom of the piles.
- While you are waiting, mix new bedding and place it back in your worm bin so you have a place to put the worms as you separate the compost from the worms.
- Start harvesting the compost by gently taking it from on top of the pile and separating the worms from the finished compost as much as you can.
- Look for worm cocoons or eggs (small yellow, lemon drop shaped and slightly translucent) and separate those out and add back to your bin.
 Compost that has been sorted into small piles:
 For Trouble Shooting and other questions, you can search on the internet. There is lots of good info out there! You can use worm castings right away by sprinkling them in your garden or yard or giving away to friends. Sometimes you accidentally start a garden IN your bin, check out what happened to some cherry tomatoes I put in my bin….the seeds sprouted! And yes, you can transplants starts from your bin. Happy Composting everyone!

Cherry tomato sprouts in the work bin! You can transplant these to your garden or just fold the sprouts back into the compost.
Leave a Reply